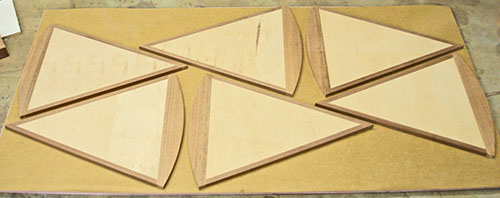
| I had planned on using the
leftover veneer from cutting the main top’s wedges for making the
radial wedges in the pedestal base. So even though I wanted to start
veneering the base, I had to cut out the pieces for the main wedges
first. I laid out the wedges on the back-side of the 4x8 sheet of veneer (it’s a paper-backed veneer). I made sure the wedges were perfectly aligned with the grain of the sheet, and gave myself a 1-inch of gap between each piece. Originally, I could only get 5 wedges on the sheet, but with a little tweaking, I managed to get 6 of the 8 on a single sheet. The fit is so perfect that I can’t move the wedges even a fraction of an inch without loosing my 1-inch safety gap. |
 |
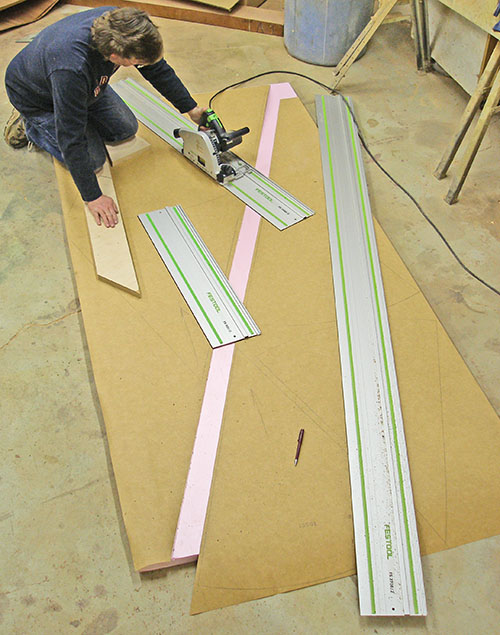
| I picked up a sheet of 1-1/2 inch
Styrofoam insulation so I could cut through the veneer without cutting
into the floor. You can see that I am kneeling on pieces of scrap wood.
I used these to prevent denting the veneer while I was walking or
kneeling on the sheet, because the Styrofoam compresses easily. In the past I have just used a knife to rough-cut veneer stock like this, but I decided to try using the TS 55 guided saw instead. This worked very well, and I didn’t have to worry about tearing the wood fibers with the knife. Even though these were just rough-cuts, it did pay off later when I was cutting the smaller wedge pieces described later. I planned out the sequence of cuts so that none of the cuts would cross into another. The first cut was to split the sheet diagonally down the center. The cut I am making here is for the first wedge. These cuts didn’t have to be perfect so I simply laid the guide rail down the center of the 1-inch gap between pieces. The sawblade was set to about 2-mm deeper than the veneer. As you can see, I have three different lengths of guide rails (the short one arrived just a couple days before I took this picture). I've heard a lot of people say they prefer to join two small rails instead of having the long rail, but in situations like this, I sure do appreciate having each one separately to choose from. I've wanted the short rail for a long time, but kept forgetting to order one. It really comes in handy when working with smaller cuts.
|
 |
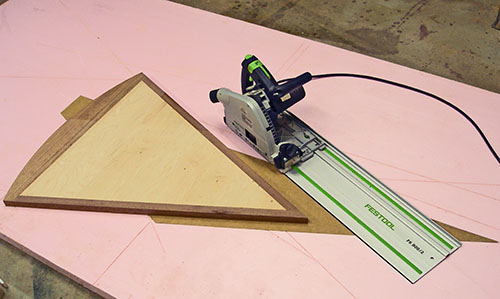
| After cutting the main top’s
wedges, I used the left over pieces of veneer to cut out the wedges
that will make up the radial pattern of the pedestal. Because I knew the tabletop wedges were perfectly cut at 45 degrees, I used one of them as a pattern to layout the angles on the veneer. I placed the wedge on the veneer lined up with one edge, and then butted the guide rail to the wedge. With the guide rail in position for the cut, I slid the wedge out of the way to make the cut. At first glance you might have thought that this method didn't account for the kerf of the blade, but keep in mind that this was only for setting the angle. The length of the piece is determined separately. When I cut the big pieces, the cuts didn’t have to be perfect, but for these small pieces, the cuts did have to be perfect because they would be joined together. This was why I decided to use the guided saw in the beginning so it would make perfectly straight and sharp edges. In the past, the only method I had for jointing the edge of veneer like this was with a router and a straightedge. |
 |
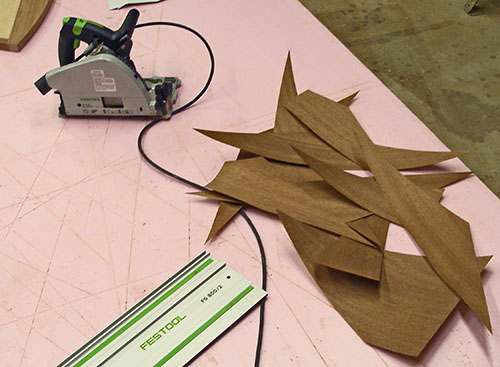
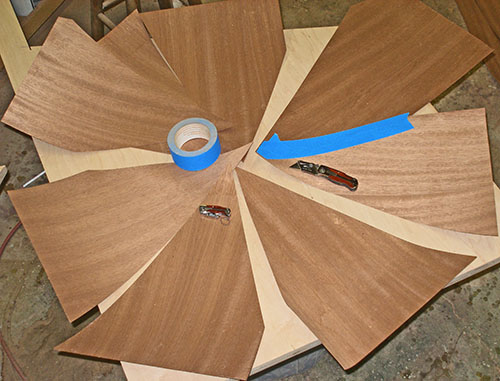
| . I used 1-1/2 sheets of veneer to cut the tabletop wedges and the pedestal wedges. When I was finished, I was surprised by how little leftover scrap I had. From all these odd shapes I had to cut, this is all the scrap I had left over. When I was originally planning this project out, these cuts were the most troubling to me in terms of wasted material. My initial plans had not been able to account for this much efficiency in the final cutting. Actually, I think most of this came about because I was able to squeeze in that 6th wedge into the first sheet. Oh that reminds me. Before I cut out the main wedges, I first labeled them according to grain orientation from the original sheet. Even though the chatoyance of the mahogany will make each piece radiate differently as you walk around the table, I want to make sure any two adjacent pieces are not oriented in the same direction or they would look out of place with the others. |
 |
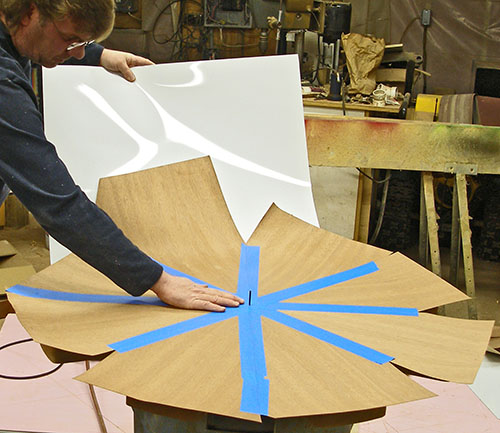
| It would be impossible to try to
make tight joints in the veneer as they were being glued down, so the
normal method is to join them into a single piece before laminating
them to the substrate. To do this, I butt the pieces together as
tightly
as I can and temporarily join them with painter's tape. Complicating this is the fact that the laminate naturally wants to curl up from being stored in a roll. The sheets had been laid out flat and weighted for a week, but they still wanted to curl. The first two pieces were the most difficult to join because the veneer was curled, but as each piece was joined to the next, the curling would cancel out. I tightly fit the pieces together as I laid down a piece of painter’s tape across the joint. |
 |
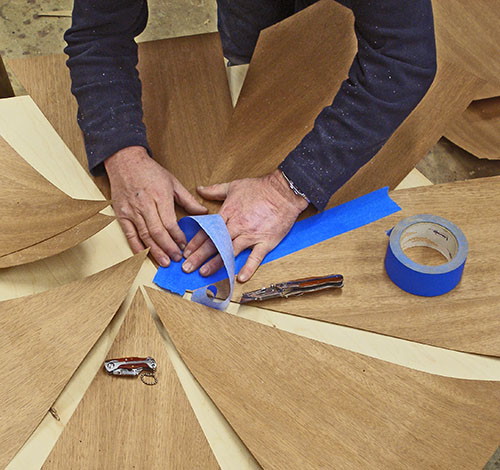
| Here you can see how I press the
two pieces together with my thumbs as I roll the piece of tape forward
over the joint. Getting the tape started straight and the joint started straight was the hard part, and I could have used another set of hands. Once started however, the rest of the joint just falls into place with little effort. I joined the first four pieces together, and then joined the other four pieces together separately. Unlike the tabletop which moves, these wedges are fixed and I can tweak the final joint to make it tight. |
 |
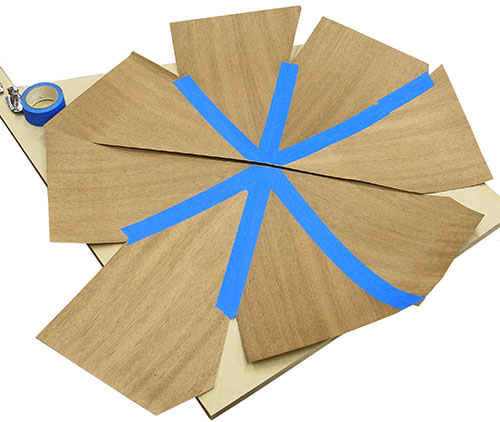
| With the two halves of the radial
sheet taped, I used the guided saw to straighten the remaining joint so
the edges were
straight. I didn’t have very much to trim though. The original angles
were cut close enough to perfect that the final gap was only about
1/64-inch. As a last step, I taped the center joint down the same way I taped the previous joints. |
 |
| To confirm that my joints were
all perfectly tight, I carefully flipped the sheet over to inspect the
lines. The line that you can see in the left side of this photograph is actually just a shadow because the sheet is still curled a little. Otherwise, the joints were so tight that the only way I could differentiate one piece from another was the change in the blotching of the paper. The joint lines themselves were completely invisible. While the sheet was flipped over I drilled a small locating hole in the center. The pedestal base also has a hole in the center, and I will use the two holes to line up the sheet to the center of the substrate. |
 |
| Before proceeding, I decided to
make a dry run of the veneer lay-down process. I wanted to make sure
that I could insert a drill bit into the two holes to align the veneer
to the center of the substrate without letting the two pieces touch.
You can see the drill bit in the center
of the picture. Actually, the original reason for doing this dry-run was to stage this photograph to show you how I did the veneer. I had already decided that the veneering process was going to be too critical to risk loosing my concentration to stop and take a picture once the process was started. I am very glad I stopped to take this picture for all of you to see, because during this dry run I realized that if the sheet was not rotated perfectly, the seams in the veneer would not line up with the seams in the solid wood edging. Prior to this sudden revelation, I had been thinking that the rotation of the sheet would not be very critical, and I could be off by degree or two. This would have been a very noticeable mistake! |
 |
| Some of you may have been
wondering why this is a paper-backed veneer instead of just a thin wood
sheet. First off, I don’t think you can even get a 4x8 sheet of veneer
that isn’t paper-backed because it would be too unstable and break.
More importantly, I always specify paper-backed veneer (regardless of
size) because I prefer to use contact cement for all of my laminations.
Hold on! Before you go reaching for your poison pen to fire off an angry email, I am well aware that a lot of hobbyists have been engrained to never use contact cement for laminating wood veneer. I've heard this several times in the past, and that assertion is very true when you don’t use a paper-backed veneer. However, this veneer is specifically designed for use with contact cement, and actually, using PVA glues is not recommended by the manufacturer. The reason why I prefer contact cement is because I can be assured of a bubble-free lamination every time. The last time I used PVA glue and a press for laminating was for a story I was editing while working for American Woodworker Magazine. I had to build the stereo speakers for that article according to the author’s specifications (he did not provide the speakers for his story) including using PVA for the lamination. Even though there were no visible bubbles, I could tap my fingernail on the surface and hear the “tinny” sound of poor adhesion. I don't have this problem with contact cement. |
 |
| Contrary to my initial concerns,
I did find a time when I could pause for a moment and take a picture of
the actual veneer process. The white sheet you see is a piece of 0.030-inch PVC film that I normally use for photography (bouncing the flash). This is literally the same stuff your credit cards are made from, and is a piece of the blank card stock before it gets processed into cards. I used 3 of these sheets to separate the veneer from the substrate while I positioned and rotated the veneer. I used this material because it is thin enough for accurate positioning, yet slick enough to pull out without sticking to the contact cement. This is the last of the three sheets I am pulling out so that I can press down the veneer evenly from the center, outward. |
 |
| I do not like using J-rollers for
laminating, regardless whether it is plastic laminate or wood laminate
because I cannot apply sufficient pressure to the laminate through the
handle. As a matter of fact, the manufacturer of this wood laminate
warns against using J-rollers for this same reason. For years, I have used this old rolling pin to roll out my laminates. Even though it is rather wide, I can apply my entire body weight to the roll, to the point that the handles are a little bent. However, when working with wood veneers, even this is insufficient for applying enough pressure. I rolled out the veneer with this pin simply to get a good enough adhesion to trim off the excess material. |
 |
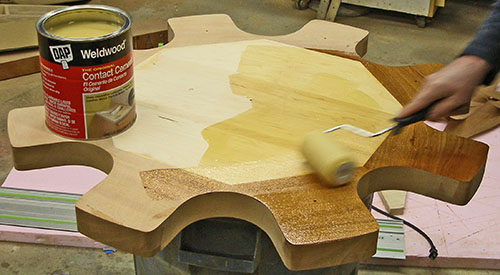
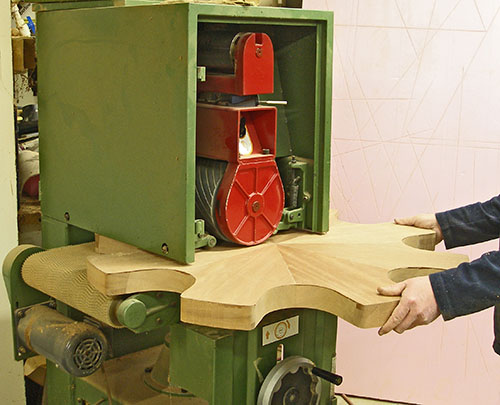
| After trimming off the excess
laminate with a utility knife, I used the wide-belt sander to press the
laminate to the substrate. I removed the sanding belt from the sander
and raised the conveyor bed until I could see the sanding drum compress. With the main drum motor turned off, and just the conveyor motor running, I fed the base through the sander several times to press the veneer. The soft conformance of the sanding drum is perfect for pressing down laminate. I don’t know how much pressure this was applying, but it was enough to cause the conveyor motor to strain, and was certainly more than I could apply by hand-rolling the veneer. I’ve use this method whenever I can. |
 |
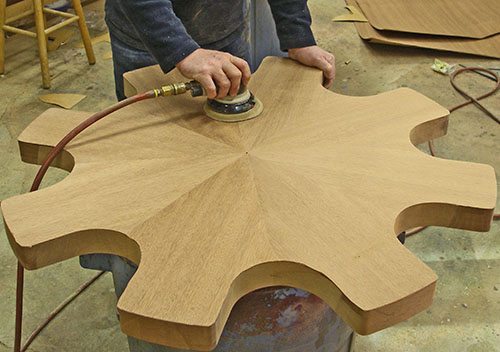
Just for my own gratification, I sanded the veneer to clean it up so I could see how well it looked. I will still have to route the edges later on, and re-sand after that, but I wanted to see how tight the final joints came out. |
 |
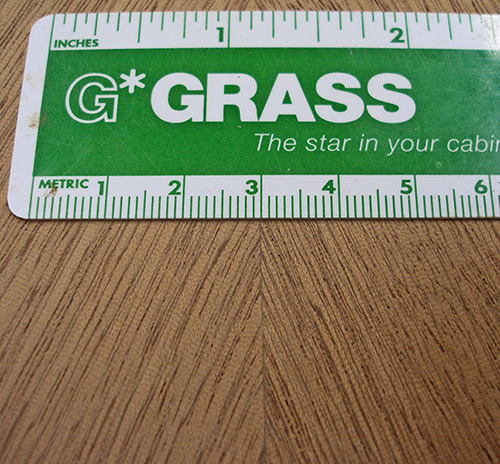
| To give you an idea of how well
the joining of the pieces went, I took this “super-macro-mode” picture,
where the camera was less than 2 inches away from the surface. This
isn’t just the “best” joint, they were all this tight. I am very
pleased with how this came out. In case it’s not obvious, that’s a
metric ruler for reference. |
 |
Up Next: Actually, I am not sure yet because I still have to go back and finish up the discussion on the leaves first. |
|
| <<PREVIOUS NEXT>> |
 |